contact us at Buzzardbushcraft @ gmail.com

Monday 31 October 2011

Basic Firebow / Bowdrill

I have a bit of a bee in my bonnet about the firebow, firstly most people call it a bow drill, but a bow drill was a wooden spindle with a flint microlith in the tip used to drill holes in wood in our pre history days, so it's a misnomer even from the start..Also people say about going out in the woods and doing it from scratch when they use knives and paracord for the set up, again a falsehood, if you want to do it from scratch do it with NO modern materials and make everything ON THE DAY, including the cordage then I will applaud you. I have much more respect for the hand drill than the bow drill, but that is a skill I have never mastered.
The firebow is very simple provided you keep to a few simple rules, use the right wood, keep it dry and take your time, If you practice in a control situation like your home you will get an ember to flame in the vast majority of times, there's no magic to it, it's simple, anybody who tells you otherwise is simply perpetuating an illusion


Position yourself comfortably and grip the bow and your bearing block securely, here I'm using a long bow (30" sycamore and it's flexible, probably the opposite of what most people tell you to use!) and a limpet shell for the bearing


Start your bowing action slowly to start with, gently heating up your spindle and hearth board, in this instance it's willow on willow


Once you start to get good smoke, start bowing slightly faster and add a little more downward pressure, keep this going for a dozen more good strokes


Once your pile of dust ( and it doesn't matter if it's coarse or fine dust, darker is the key here so go for black not brown dust) is smoking by itself you have a coal, fan it lightly with your hand to feed it oxygen and help it grow. (note the man made cordage, no illusions here!!)


Add it to your tinder bundle whatever that maybe, here I'm using flax but dry grass, cat tail, thistle down, fireweed etc all help make good tinder bundles


Blow gently on your ember to start then gradually increase the force


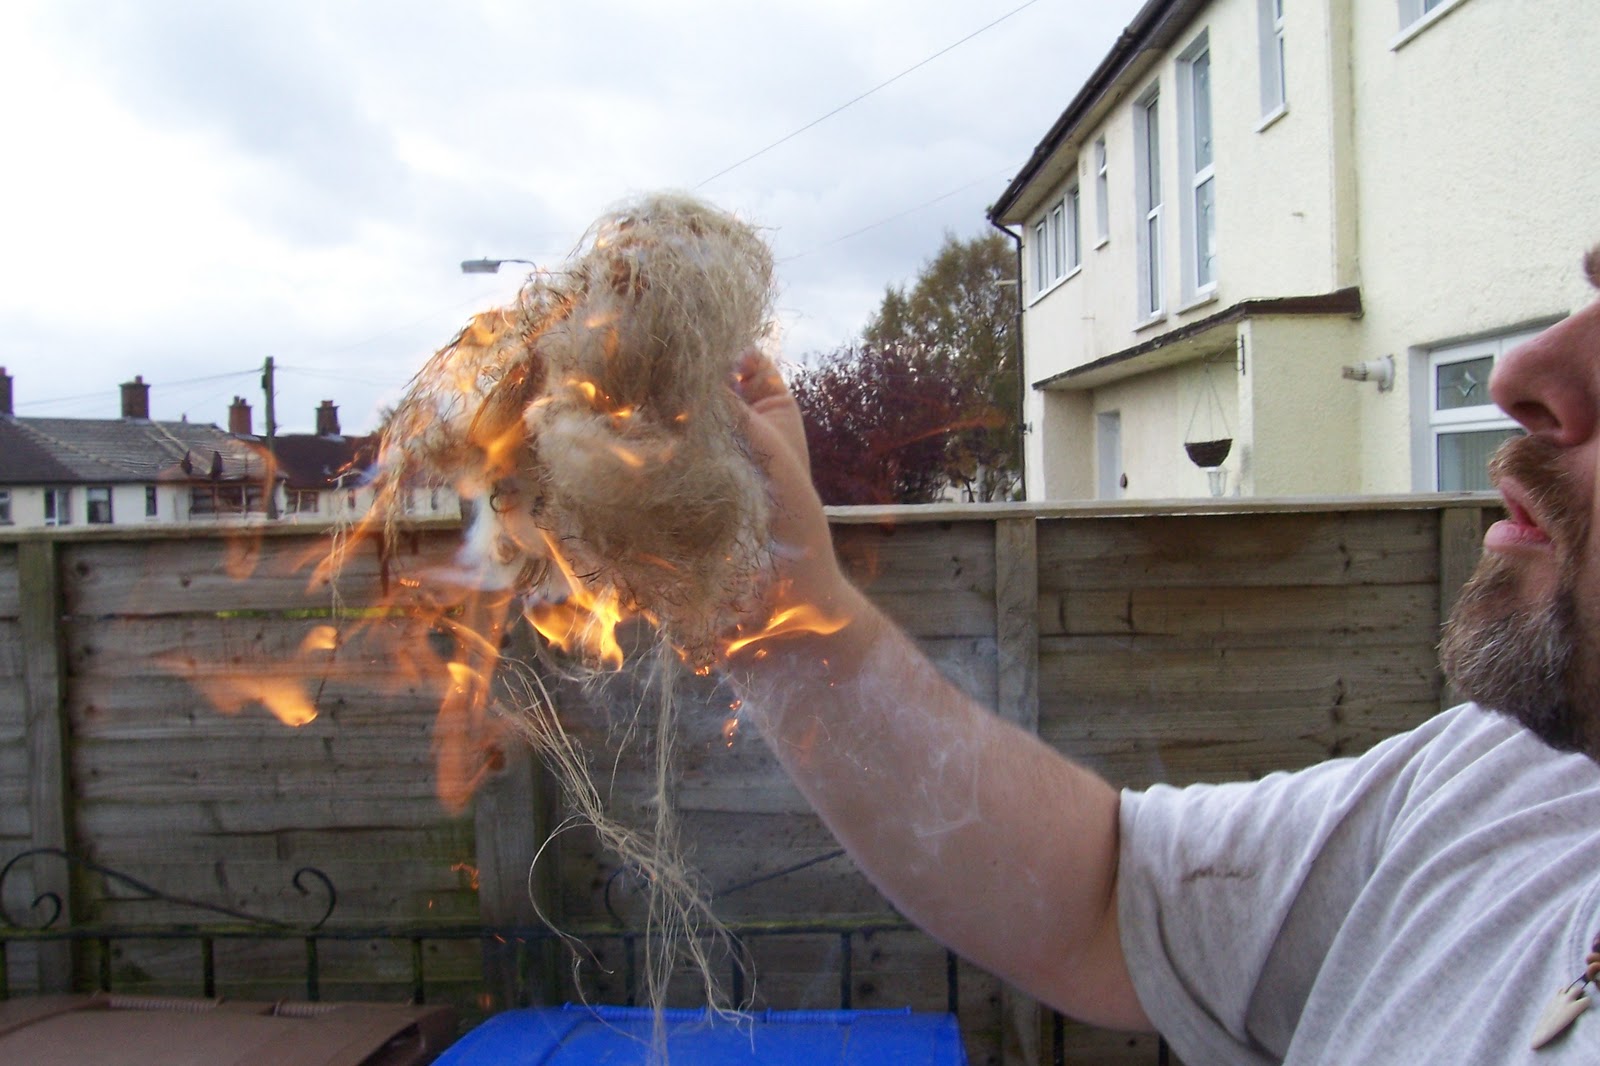
in a few seconds you will have fire, it's that simple..don't let anybody tell you it's tricky it just needs a bit of practice..this was the first time I've tried firebow in over a year and from 5 attempts I got 4 embers and 4 to flame and only then because I split the hearth board on one attempt, not too bad for somebody who dislikes the method, however I'll take Flint and Steel anyday!!
Thanks to my son Logan for taking the pictures!!

Sunday 30 October 2011

Following Fallow

We got a very welcome invitation by a couple of friends to come down to their neck of the woods to try and get some sightings of Fallow deer, now as before we've got good pics of sika and reds but never the most common deer in Northern Ireland, the Fallow.


There was great sign everywhere


Great prints


This particular place was full of droppings, tracks and scrapes..We did a lot of stalking for them and saw little until we were heading back to the camp, when we noticed a pair of ears flicking above the bushes and as we turned to move towards it up jumped a fallow hind in her dark winter coat and took off so fast I didn't even have time to turn the camera on never mind get a pic, thing was we moved within 10 feet of her before she jumped up and it makes me wonder how many we actually passed that day but never even saw!! At least we know they are there in good numbers so my quest for a pic of a fallow to finish the holy trinity of deer in NI will hopefully be fulfilled soon.

Wednesday 26 October 2011

Finally finished the lime bark cordage project

Well it has taken 2 months to ret the lime bark and enable me to remove the inner bark which will eventually be made into cordage. Most of the writings I've seen say that it takes 2 weeks to ret, however one scandinavian piece I remember reading said it took 8 weeks and this has turned out to be correct, whoever said they can do it in 2 weeks have either never actually done it and are just plagerising others or live in a much more arid place than I do..


I did some in a bucket and some in a stream and unusually the one in the bucket was more orange in colour while the one in the stream was more creamy coloured, have no idea why this is!


Out of the bucket, really smelly and ready to have the inner bark removed


One coil of inner bark removed


Two coils of inner bark removed and out to dry, (repeat for another 6 coils!!)

The bark is relatively good and although not all of an even thickness it was a good learning curve and has provided us with some raw materials for some small projects.

Sunday 23 October 2011

Welig Weekend part 3

We finished the weekend by having a look at the different types of willow that Clive grew on site and also some great tips on what types to use for baskets in the field, however we wanted to see his pole lathe in operation so out it came


Clive setting up and getting ready for action


Starting to turn a green section of ash


Stephen getting to grips with his wood!!


Gibson mastering his stroke


Davy making vast amounts of shavings.

All in all a great time with Clive and I'm sure our paths will cross again in the future..


Wednesday 19 October 2011

Welig Weekend part 2

After we had made the tray it was time to start on the basket proper


We were shown the basics of the base then tried one for ourselves


After the bases were complete we had to decide on the particular pattern of weave we wanted to use and most of us went for a French rand with a 3 rod wale thrown in for good measure


Getting ready to start the weave


You can easily see the difference between the 2 types of weave in this picture as the basket begins to take shape


Basic basket completed, I just hope I remember how to do it again in the future!!


We also decided to put on a couple of different types of handles


Happy chappies with what we had accomplished


Sunday 16 October 2011

Wonderful Welig Weekend

We had a great time with Clive down at portaferry at his Welig Crafts Workshop, we had wanted some tutoring in basic basketing techniques and he didn't disappoint. Just to get us used to working with the willow and finding out how to manipulate the wands to make them more pliable he had us make a simple willow tray, these can be made very quickly and will provide you with a multitude of uses..


Selecting the appropriate willow to make into the frame


Use 3 or 4 rods in an overlapping form to create the frame


Frame made and ribs in place ready to have the weavers put in


The first few are the trickiest to put in but once they are in place the rest is a simple weave working from the middle out to each side


It's a wee bit tricky till you get in the sway of things then everything flows very quickly


Once all the weavers are in place it's a simple matter of just trimming them down


And the finished product, you can leave the ends unwoven to allow for hand grips on each side or just weave right till the edge of the frame, it's your choice. They can also be made any size and have a multitude of uses,

More to come!


Friday 14 October 2011

Tallow Candle

A good friend of mine (Tombear on BCL) has been experimenting with Tallow candles and producing some fantastic work, he likes to keep things as accurate as possible to the period and as such he wanted to use flax wicks, so I made some for him and sent them over and the result you can see below, he will also be making more candles from specially made tin moulds and hopefully I'll be able to show you pics of them when they're done..


Copyright of this picture belongs to him

Thursday 13 October 2011

Sea Kale

I've seen in Roger Phillips book that this particular plant only grows on the south coast of England ,it is supposedly rare to non existant further north,well as you can see nobody told the plant that Portmuck strand is too far north..


The plants we found we're small but we did find a few of them, but whether their diminuitive size was due to their latitiude or the time of year yet remains to be seen, we will investigate them again next year to see how they have fared.


The seventeenth Century Herbalist Gerard says of this plant..
" Groweth naturally upon the bayche and brimmes of the sea where there is no earth to be seen but sand and rolling pebble"

It's not the leaves that are normally eaten but the young flower spikes and these can be a glorious purple colour at the right time of year, alas I think we are just too late for them this time,but roll on the Month of May next year we when our investigations shall continue.


Sunday 9 October 2011

Fossil Foragers

I'm lucky enough to have a resident Geologist in the museum where I work and recently we had been discussing finding fossils around the province, he kindly let us know where some great Belemnites could be found, so we set off with great anticipation


Here's the first one we found


And some more


And more, we even found some small ones that we were able to bring home.

Wednesday 5 October 2011

Pine Pitch

I've run out of pine pitch so I decided to make a quick batch for a few projects


The ingredients are simple. firstly melt down some pine resin, do it slowly! Whenever I try this over a campfire it normally bursts into flame so keep the temperature down


The other ingredients are a little charcoal finely crushed and some beeswax, some people add a fiber to help bind it like powdered rabbit droppings but to be honest in all the time I've been making it I've never found it to be that much more adventageous


Once the resin has fully melted then remove any impurities like bits of bark or pine needles, I like to use chop sticks to do this as they have a dual purpose as we will see shortly


Add all the ingredients and heat slowly until everything has disolved and mixed together


Then using your chopsticks dip them in the pitch to form a blob on the end, this can then be heated or lit and the pitch dropped on whatever you need it for, I also like to keep a small tin of pitch as I  find it's easier to heat and use that way, and there you have it Caveman Hot Melt glue!

Sunday 2 October 2011

Spruce root cordage

I think it's important to be able to make cordage in whatever environment you're in and cordage is such an important facet of the bushcrafters armoury that it should be given a higher place than it is, after all it's one of Dave Canterbury's 5 C's..


Some roots freshly extracted


If the roots are too thick they will need to be split, this one is about 1/2 inch thick so we decide to quarter it. First cut a split in one end with your knife then gently start to work the split down the length of the root, if it starts to run off centre then bend the thicker bit slightly more and the spli will run back to the centre


Successfully quartered


Lots of split roots hung up ready for use


If you need a long length of root cordage it won't reverse twist well so it's best to braid or platt it adding in extra as you go along, this also makes it more flexible and allows a bigger variety of knots to be used.


It's finished length is limited only by your stock of roots and personal patience!!